|
|
World War II Armed Forces — Orders of Battle and Organizations | Last Updated 02.10.2003 |
Belgian Fortifications, May 1940 Written by
[
Overview |
Deep Defences |
Border Defences |
Conclusions
]
Deep Defences The Antwerp-Namur-Givet line, which should have been Belgiums (and the Allies) main battle line, is the main deep defence. It could have been quite strong, but as it turned out, too many resources were spent on border defences (mainly in Liège and the Ardennes). Other deep defences included a fortified bridgehead on the West bank of the Scheldt (Ghent), a position covering the Southern approaches to Brussels and light fortifications on the coast. Antwerp-Namur-Givet To the North, the position was anchored to the Position fortifiée dAnvers (PFA). It was then prolonged to the South by the KW line, from Koningshooikt to Wavre. From there, a continuous anti-tank barrier ran to the Position fortifiée de Namur (PFN). The last stretch of the line, i.e., the Meuse valley from Namur to Givet in France, was practically devoid of fortifications. Antwerp (PFA)
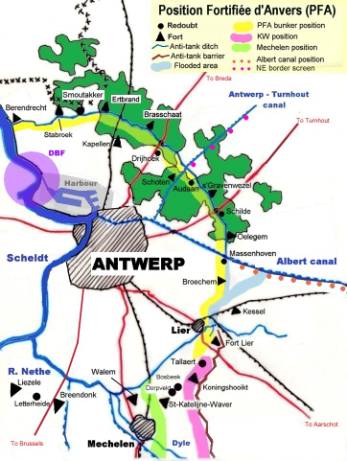
On the eve of World War one, two concentric rings of defences protected the strategically important port of Antwerp. The Inner ring, at the edge of the city, consisted of an earth wall and a moat flanked by nineteenth century brick and mortar forts. The Outer ring formed a 94 km long arc around Antwerp about 15 km out. It was made of a string of forts and redoubts armed with artillery in steel turrets. Most works were built between 1906 and 1914 and were made of unarmed concrete. Three forts in the bends of the river downstream from Antwerp protected the city from a naval attack. In 1914, the Outer ring was assaulted by the German army and was the scene of heavy fighting which eventually precipitated the fall of the city in October 1914. In 1917, the German army undertook to repair some of the defences and created the Antwerpen-Turnhout Stellung to guard against an Allied invasion from The Netherlands. The position ran along the Northern section of Antwerps Outer ring and the Antwerp - Turnhout canal. A total of 524 bunkers were built in the intervals between the Belgian forts, from the Scheldt to the intersection with the Turnhout canal. These bunkers had 0.5 to 1 m thick unarmed concrete walls. The roof was made of steel-reinforced concrete, 0.6 to 0.8 m thick. The bunkers were designed to resist sustained 75 mm fire and/or occasional hits from 150 mm shells. After WWI, the defences were left in disrepair until 1934, when Belgium decided to fortify Antwerp once again. The new position, called Position fortifiée dAnvers (PFA) had a threefold mission:
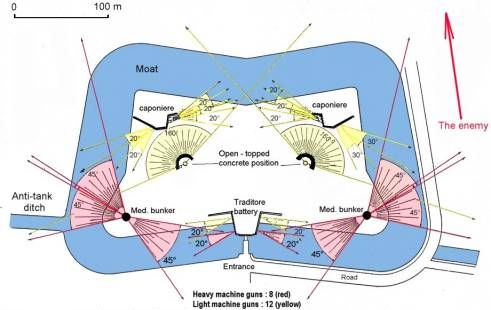
To accomplish this mission, the Outer ring was rebuilt and strengthened by anti-tank defences and layered bunker positions. The forts were renovated and repaired, but not rearmed with artillery. Each fort was converted into an infantry stronghold to be defended by one machine gun company (8 x heavy machine guns, 12 x light machine guns). The garrison deployed most of its heavy machine guns in modern bunkers built on top of the old turret pits where they provided flanking fire on the intervals between two works. The remaining machine guns were installed in open topped concrete positions on the forts glacis and inside the traditore battery and the caponnieres to defend the fort itself. Each fort was also fitted with airtight gas shelters. External Link: Description of a PFA Fort (Liezele).
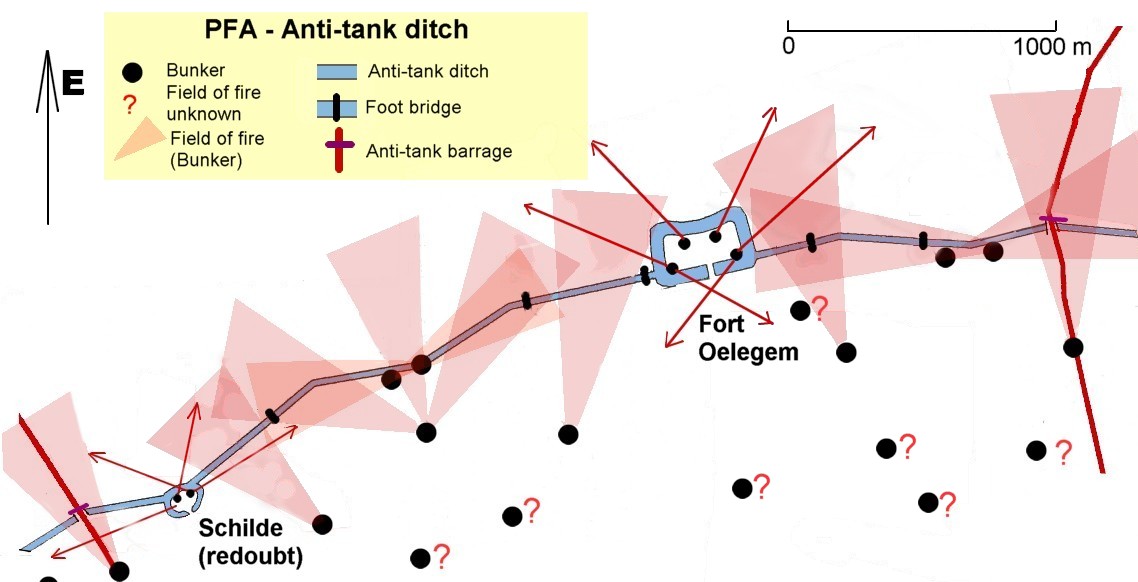
The smaller redoubts were converted into platoon-sized positions for one reinforced machine gun platoon (2 heavy and 6 light machine guns). The heavy machine guns and two light machine guns were positioned in two bunkers built on the front face of the redoubt; the remainder of the guns took position in the traditore battery. Machine gun bunkers defended the intervals between the forts and redoubts. In most places, these formed two successive lines. The Belgians built the bunkers in the thirties, but in the Northern section of the PFA, the line included many converted German WWI bunkers. The Belgian-made bunkers were all of the standard medium type, some with two or even three firing ports, most with a single firing port. The anti-tank defences were made up of an anti-tank ditch and a combination of flooded areas and steel obstacles. The anti-tank ditch (built 1938-1940) was 30 km long and connected the forts and redoubts of the North Eastern section of the PFA, from the mouth of the Scheldt to the Albert Canal. The ditch was 14 m wide and contained 2 m of water (this could be raised to 2.5 m if needed). It ran in a broken line, with machine gun bunkers at the inner angles. The roads crossed the ditch on earthen dams with an underpass for the water. These dams could be barred quickly by anti-tank obstacles (Cointet gates mostly). There were 15 such crossings. In addition, the military built 33 light removable bridges to allow infantry to cross over and man the outposts of the position.
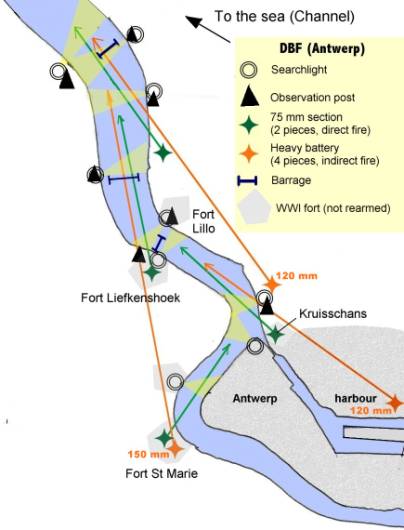
From the Albert canal to Fort Koningshooikt where the KW position linked up with the PFA, the anti-tank defence consisted of a flooded area - from the canal to Lier - and a steel barrier mixing rail fields and Cointet gates from Lier to Koningshooikt. To ward off an attack from the sea through the mouth of the Scheldt, the Belgians created the DBF (Défense du Bas-Fleuve), a special artillery command consisting of two 120 mm batteries, one 150 mm battery, four 75 mm gun sections, one searchlight platoon (nine searchlights) and three river launches. The DBF operated from the river forts downstream of the city.
In May 1940, the PFA consisted of a string of 23 forts and lesser works, 560 bunkers and a continuous anti-tank obstacle. These defences were supplemented by a network of field works carried out by the mobilised Belgian army in the months leading up to the invasion. It was a strong and coherent infantry position. The PFA, defended by 4 Belgian infantry divisions, came into contact with advancing German troops on 16 May. After successfully beating off a German attack (by ID 225) on the North face of the position on 16 May, the Belgians started to evacuate the PFA in the evening of the following day. At the same time, two German divisions (ID 208, ID 256) attempted to breach the line from the North East. In the ensuing battle, the Forts of Schoten, Brasschaat, and Driehoek gave the Germans some trouble, and effectively covered the retreat of the Belgian divisions. There was no significant fighting on the rest of the PFA. Mechelen Bridgehead A small independent position, behind the KW line: Twenty-one pillboxes of unknown type. KW Line (60 km)
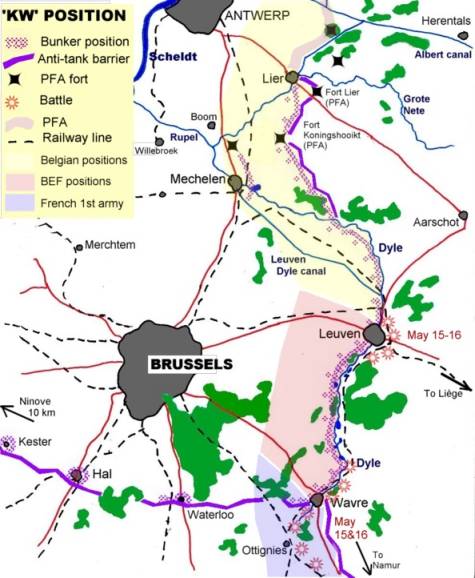
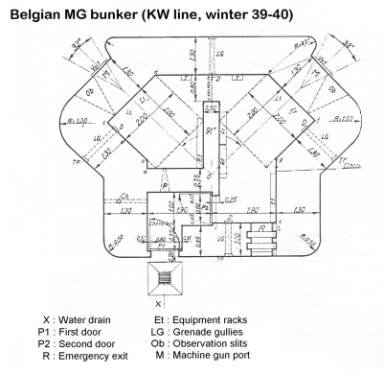
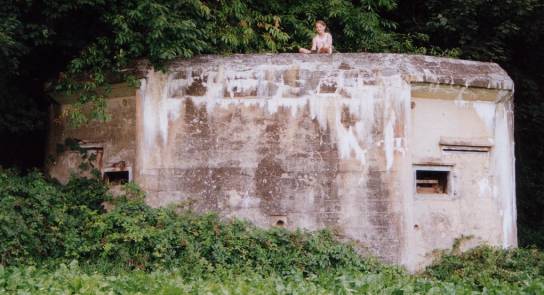
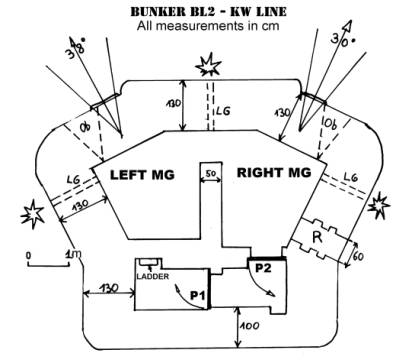
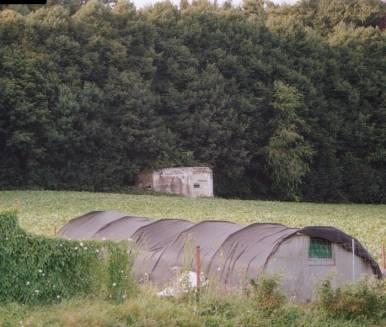
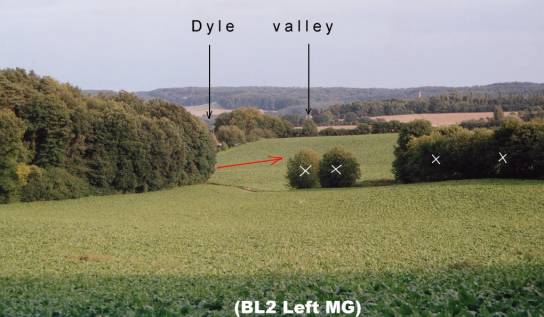
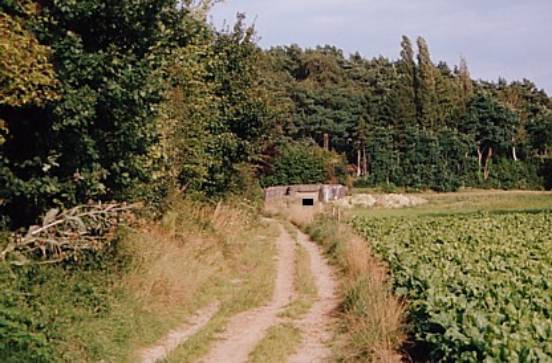
The KW line, or Dyle line as it was referred to by the Allies, covered Brussels and connected the PFA with Namur. It ran from the fort of Koningshooikt near Antwerp to Wavre (hence the name: KW) along the marshy Dyle valley, a natural tank barrier. A total of 235 pillboxes were built there in the winter of 1939-1940. The KW bunkers were all medium-type machine gun bunkers armed with two firing ports positioned to give flanking fire. Most had overlapping fields of fire. Like most bunkers the Belgians built in the thirties, the works were camouflaged or made to look like sheds and small houses through the use of paint, planking and light brick walls. Though well conceived and protected by an anti-tank barrier formed of Cointet gates and rail fields from Koningshooikt to Leuven and the flooded Dyle valley from Leuven to Wavre, the line had little depth: In most places, the bunkers formed a single line, backed up with clusters arranged for all-round defence in the second echelon.
KW was a battle position. It formed the central part of the Dyle position, where the Allies wanted to give the Germans battle. The position was assaulted by German infantry divisions on 14 and 15 May, with furious battles in the Leuven area (defended by the Belgians and the BEF) and around Wavre (BEF). The Allies held their ground and pulled back only because of the catastrophic developments on the Meuse further South.
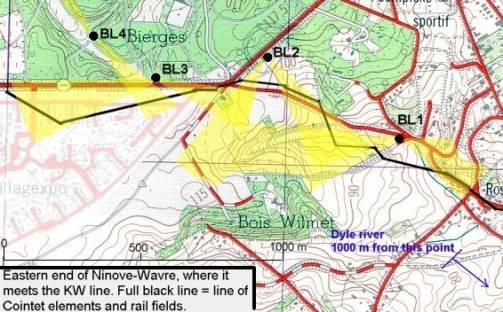
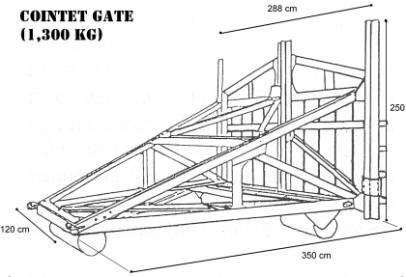
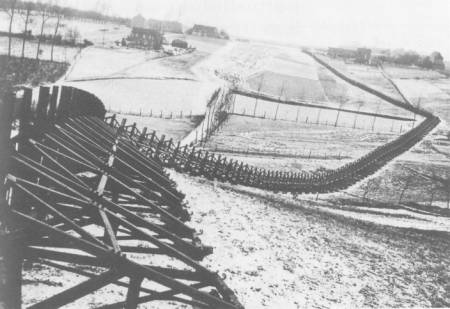
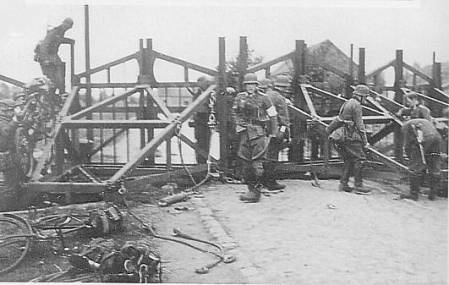
Gembloux Gap This 28 km stretch of rolling farmland between the Southern flank of the KW line and the Namur position was not fortified. The Belgians had planned to close the gap with a continuous line of anti-tank obstacles of three types: tetrahedrons, rail fields, and Cointet gates. Of the three, the Cointet elements or Belgian gates were by far the most common. By 10 May, 5,000+ Cointet elements and 2000 tetrahedrons had been placed. Note that the Southern third of the Gembloux gap is within the firing range of the Namur forts.
The gates were riveted (rivets were broken off after assembly) together to form a continuous anti-tank obstacle that was impassable to vehicles and could not be rammed even by heavy tanks. Since they were mounted on steel cylinders, the gates could be moved to let traffic pass. To be effective, the line had to be broken in zigzags and automatic weapons had to be placed in the inner angles (the sheer mass of steel stopped many of the bullets that were fired at the gates). Infantry could not pass through the gates and had to climb over them. The Steel Wall, as it was sometimes called, proved useless as the Belgian High Command displaced it several times. As a result, on 10 May, workers were still assembling gates on the final position and there were many gaps. The gaps led French First Army, which had been assigned to the Gembloux sector, to deploy several miles behind the barrier, along the Brussels Namur railway line. The Gembloux gap was the scene of heavy fighting between the French and the Germans on 14 and 15 May with the French barely hanging on to their positions before they were ordered to retreat because of the Wehrmachts breakthrough at Dinant and Sedan. Position fortifiée de Namur (PFN)
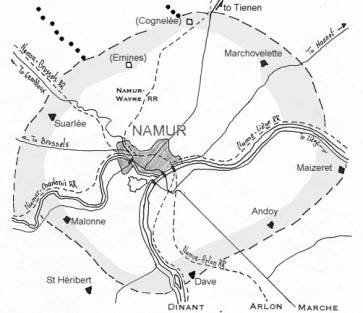
The seven rearmed forts* of Namur made for a total of 40 long-range guns in rotating steel turrets (some of them retractable). Heres the breakdown:
* Belgian forts will be described in detail in a follow-up article. ** Ranges: 105mm: 12km; 75mm GP: 10 km; 75mm howitzer: 5.2 km The intervals between the forts were defended by 156 modern pillboxes of various types (light and medium types), to be manned by the field army. The total of 156 includes seven large anti-tank bunkers barring the main roads. The PFN was protected by a continuous line of anti-tank obstacles made of Cointet elements, rails fields, tetrahedrons and concrete Dragons teeth. The Namur position was a battle position. It formed the Southern anchor of the Dyle position, where the Allied planned to stop the Germans. The PFN was defended by Belgian VII corps (Eight Inf and Second Chasseurs ardennais divisions), which had had ample time to dig itself in and create a solid position, protected from armoured assaults by the anti-tank barrier and supported by the artillery of the forts. However, events to the South forced a change of plans and with the panzers pouring across the Meuse South of Namur, the Allies could not hold the Dyle line anymore and pulled back on 15 and 16 May. VIIth Corps abandoned the PFN without a fight, leaving the forts to fight on alone. The Ghent Bridgehead
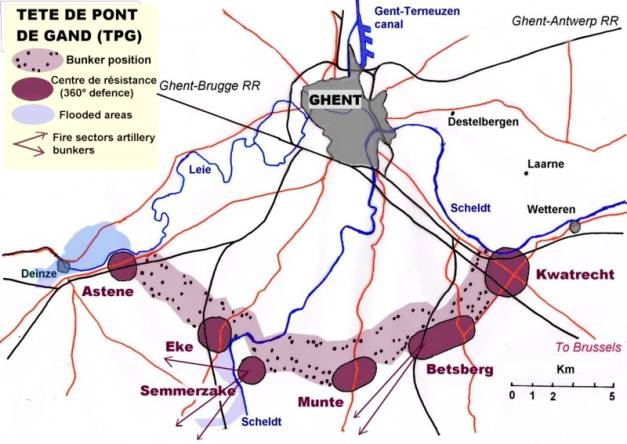
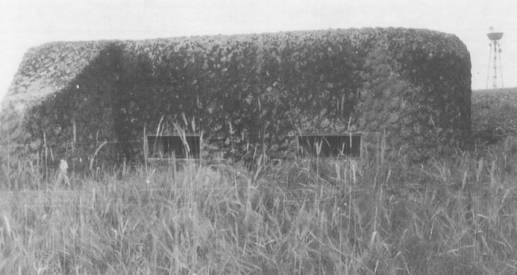
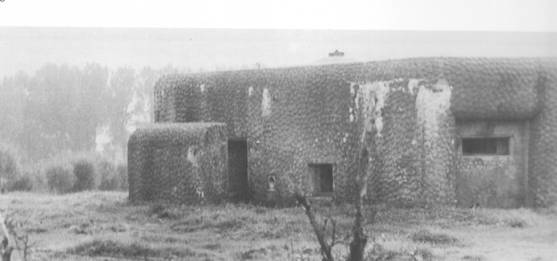
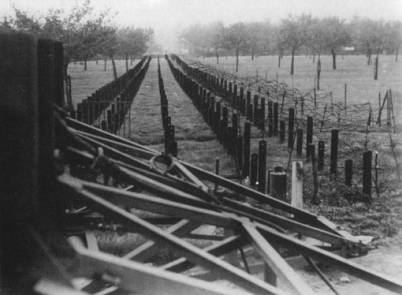
This is a 20 km long position linking the Leie and the Scheldt built in 1939-1940 to form a protective belt around Ghent. The Ghent bridgehead or TPG (Tête de pont de Gand) was made of six bastions straddling the roads and railroads leading to Ghent. Each bastion was a dense network of bunkers providing a layered defence against attacks from all sides. The bastions were linked together by two or three successive lines of bunkers. There were 228 bunkers in all. Most were medium type machine gun bunkers with one or two firing ports, but there were also a small number of large anti-tank bunkers and artillery casemates for 75 mm field guns. The TPG bunkers were integrated in field works (trenches, barbed wire networks, dug outs) carried out by the field army. There were some anti-tank obstacles present, but they did not form a continuous barrier over the whole length of the position. German units made contact with the Ghent position on 20 May, 1940, after the retreat of the Allied armies on the Scheldt. An attack by 56 ID on that day threatened to break through the Eastern sector of the position, but a Belgian counterattack on 21 May recaptured the lost ground. A new German attack was planned for 23 May, but the Belgians evacuated the TPG in the night of 22 May-23. There was no fighting in the Western section (between the Leie and the Scheldt).
Brussels South This position covering the Southern approaches to Brussels was built explicitly to prove Belgiums neutrality. It was supposed to defend the capital against an invasion from France. As it turned out, it also protected the right flank of the Dyle position. This was not a line but a string of five bastions or Centre de résistance (Ninove, Kester, Hal, Braine-LAlleud and Waterloo) blocking the roads leading into Brussels from the South. Between them, the Centres de résistance totalled 49 works, most of them medium machine gun bunkers with one or two firing ports (there were also a few anti-tank bunkers). Like the Dyle bunkers, the Brussels South bunkers were equipped with separate observation slits. The position was protected against enemy armour by a continuous 35 km-long barrier of Cointet gates and rail fields.
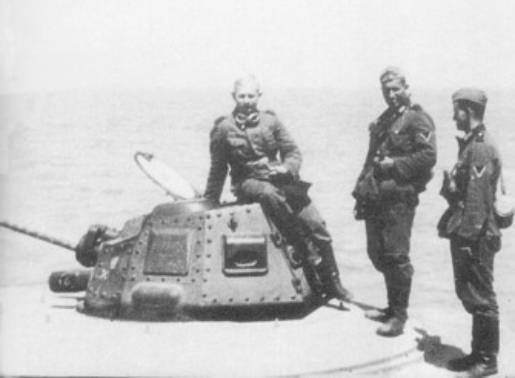
Coastal Defenses Along part of their coastline, Nieuwpoort to Knokke, the Belgians built a string of 13 bunkers armed with the French APX-2B tank turret (one 47 mm gun, one machine gun). The turrets were part of a lot of twenty-five French turrets the Belgians had ordered in 1936 to create two platoons of armoured cars for its cavalry divisions. Those plans were shelved when Parliament deemed that Belgium should not have any offensive weapons. Most of the turrets were then used in bunkers. This thin line was supported by position artillery, i.e. two 170 mm batteries in unroofed concrete emplacements (Knokke and Bredene) and two unprotected 120 mm batteries (Ostend and Zeebrugge).
The Meuse from Namur to Liège From Namur to Liège (Herstal), the Belgians installed 70 bunkers to defend the river crossings. One medium bunker (for one or two heavy machine guns, or one 47 mm anti-tank gun) defended each bridge along that stretch of the river. The bunker was placed on the west bank, as close as possible to the bridge and preferably in front of it to rake it with enfilade fire. |
|||||||||||||||||||||||||||||||||||||||||||||||||||||||||||||||||
| This article first appeared in World War II Online - Technical Publications.
Copyright 2005 Bernard Vanden Bloock |
|
|