|
|
World War II Armed Forces — Orders of Battle and Organizations | Last Updated 02.10.2003 |
Belgian Fortifications, May 1940 Written by
[
Overview |
Deep Defences |
Border Defences |
Conclusions
]
Border Defences The border defences consisted of:
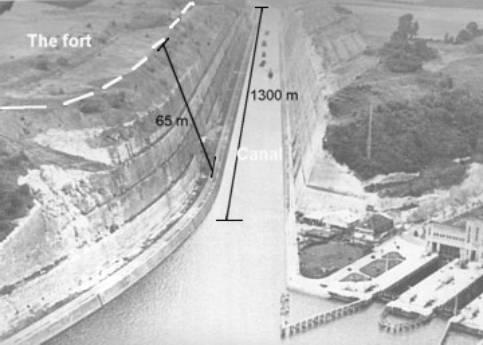
The North-Eastern Border On the Border The border was covered by a thin screen of 118 bunkers stretched in a single line along the canals connecting Antwerp, Turnhout, Dessel, Bocholt and Lanaken. This canal line was on average 14 m wide and 2.5 m deep. The bunkers were built at the edge of the water line. To the East, where the border between Belgium and the Netherlands follows the course of the Meuse, this screen was preceded by an advanced position of twelve large anti-tank bunkers, each armed with one 47 mm anti-tank gun, one heavy machine gun and one searchlight. Those bunkers interdicted the main roads from The Netherlands into Belgium. The extra defences in that area were justified by the proximity of Germany, just 10-15 km away behind a narrow stretch of Dutch territory. On the Albert Canal This was a position on which the Belgians hoped to hold the enemy for several days while the Allies would dig in on the Dyle. The canal (about 160 km long from Antwerp to the Meuse) had been purposefully designed as an anti-tank barrier. It was on average 60 m wide and 5 m deep. The earth had been piled up on the West bank, so defenders dominated the flat fields to the East. It was a serious barrier, especially in its eastern section where the banks were steep and high. In the Eben-Emael area, the canal cuts through a large hill forming an impressive gorge that would seem to preclude any assault from that side.
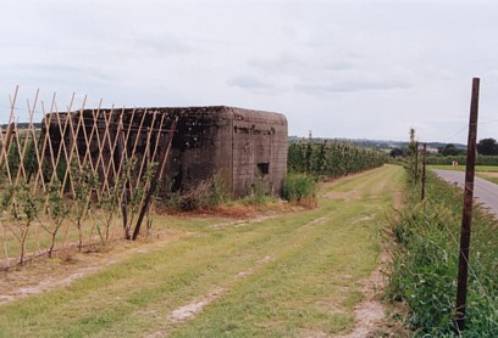
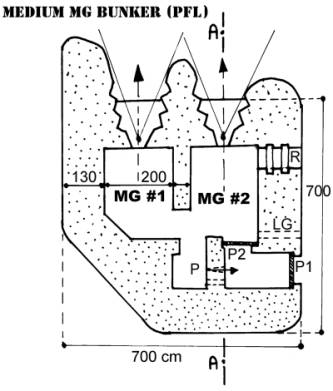
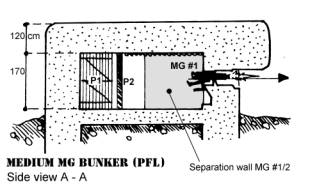
The West bank of the canal was defended by 148 medium-type Machine gun bunkers, most of them with two firing ports (two heavy machine guns). They were often built into the canal bank, spaced 600-700 m apart. The bunkers fired laterally and had overlapping fields of fire due to the long straight stretches in the canal. To the West, the canal was anchored on the PFA. To the East, it connected with the fort of Eben-Emael. The Eastern portion of the canal was the danger zone. The proximity of the Dutch border, with Germany not far behind, meant the Germans could be there in less than an hour. Worse still, the way the Belgo-Dutch border skirts around Maastricht means the Belgian have no control over the Meuse bridges in that area. The sector also formed the left flank of the Liège position. Should the enemy manage to force the canal at that point, he would be able to turn Liège. The fort of Eben-Emael was meant to conjure all these dangers. From its dominating position overlooking Maastricht, it could deny passage to the Germans. This the German High Command knew well, which led them to conceive the surprise glider assault on 10 May.
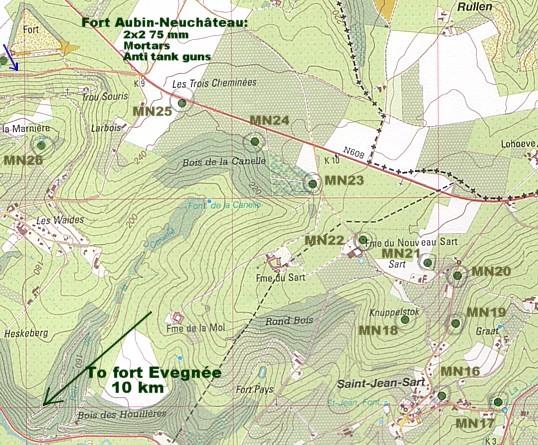
* Ranges : 120mm: 17km; 75mm : 10 km
Technically, Eben-Emael was part of the PFL but for practical reasons, it was integrated in the defence of the Albert canal, not the defence of Liège proper. Eben-Emael, and other Belgian forts, will be described in a follow-up article. External Link: Eben-Emael official web site. The position fortifiée de Liège (PFL) Initially, the PFL was meant to cover the installation of the Allied armies on the main battle line further to the West, but it was strengthened far beyond what was necessary to play that role (for political reasons) until it became Belgiums largest and most elaborate fortified system, with five successive defensive layers: a forward screen called Position avancée, PFL I, PFL II, PFL III and PFL IV. The PFL was actually too strong for a position so close to Germany and dangerously exposed by weak flanks (The Albert canal to the North, the Ardennes to the South).
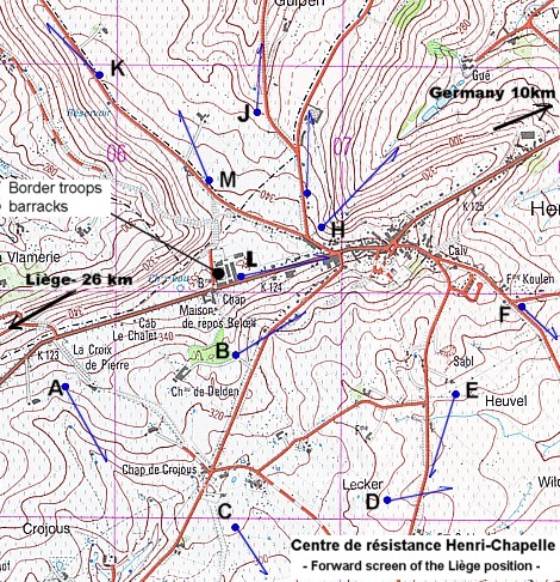
Forward screen (Position avancée) Built in 1933, the screen consisted of 66 light machine gun pillboxes (See Appendix A for more on bunker types). Each bunker had a single firing port (One heavy machine gun served by a crew of four). The pillboxes formed nine centres de résistance, from Beusdaal to Stavelot (see map). This was a delaying position, to be defended briefly by retreating border troops. In 10 May, the position was evacuated in the early morning, before the Germans made contact.
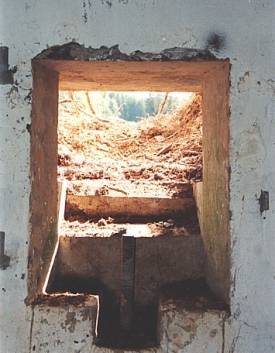
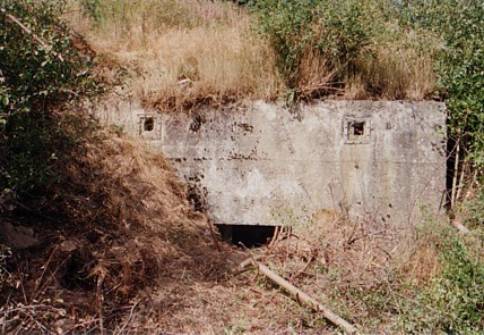
Excerpts from the Instruction on the organisation of a Centre de résistance (CR) in the Ardennes sector and the forward screen of the Liège position Ideally, bunkers will be hidden in natural vegetation or inside buildings. If thats impossible, they will be camouflaged. The aim is to prevent the enemy to observe indirect fire on the bunker. (...) It is to be noted that machine guns firing from concrete-protected emplacements will often lay down lateral fire which will often make the work more difficult to detect.
On the selection of the defensive position of each Centre de résistance
The enemys progress will follow the roads. Every road must be barred by obstacles (...). The obstacles will be interdicted by fire. When the enemy tries to outflank the roadblocks, it must come under fire from automatic weapons dissimulated in the flanking avenues between two access roads. The enemy will try to reach the flanks of the defensive position by successive flanking movements. One should therefore avoid a front that is too linear and (...) refuse both flanks.
Guiding principles for the organisation of the position
Little or no concrete on the access roads proper. Roads will be taken care of by the motorised elements that will hold the roadblocks and the immediate surroundings under their fire. However if a very favourable opportunity arises, do not hesitate to place a bunker by the road. In the flanking avenues, standing back from the roadblocks and their fire system, you will place automatic weapons (either in bunkers or in trenches). The machine guns should not be placed systematically on crest lines. They can be placed on the slope too. They do need to be invisible however for surprise is the essential factor of their effectiveness.
Infantry will be scarce on the outer limits of the CR. The infantry will give some depth to the first echelon of fire and will facilitate the withdrawal when the order is issued.
On each withdrawal line, the resistance will be organised in depth and stiffened by concrete bunkers if necessary.(...)
The flanks are the crucial sectors of the position. They will be occupied in strength. They must be able to last and need to be positioned in such a way that they can protect the loading zones and the lines of withdrawal. The flanks will be organised in depth, with flanking echelons and a sufficient number of bunkers.
PFL I A first battle line (50 km long) covering Liège about 18 km out. The line followed a wide arc from Visé on the East bank of the Meuse to Comblain on the Ourthe. It had three modern forts and 178 pillboxes arranged in two to three layers. Most of the works (built 1934/35) were medium type single firing port machine gun bunkers. A few had two firing ports (two heavy machine gun). The total of 178 includes thirteen artillery observation posts, two large anti-tank bunkers (one 47 mm anti-tank gun, one heavy machine gun, one searchlight) and four small anti-tank bunkers (see Appendix A for an explanation of bunker types). The bunkers did not necessarily have overlapping fields of fire and were grouped by threes or fours in platoon-sized positions. The intervals between two such positions were to be defended by field works and entrenched infantry.
The three forts (built 1934-1937) were similar in design to Eben-Emael, but smaller. They could withstand bombardment by up to 420 mm shells.
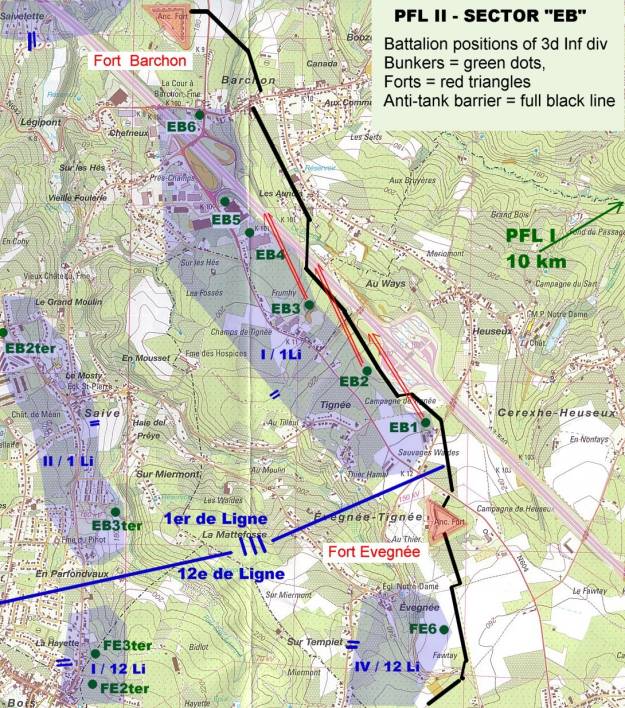
* Ranges: 120mm: 17 km; 75 mm: 10 km; 81mm mortar: 3.6 km, MVD: 400-600m. Note: PFL I was built under political pressure from the advocates of the border defence concept. When the German army reoccupied the Rhineland in 1936 however, it was realised that the position was too exposed, with the Wehrmacht almost in contact and the French army several days away to the South. The main battle line was therefore pulled back on PFL II. PFL II A second battle line, about 35 km long, covering Liège in a half-circle around the city about 8-9 km out. PFL II had six World War I forts (renovated in 1929-31) and 62 pillboxes (built 1934/5), forming a single line in most places. Most bunkers were of the medium dual firing ports type. A continuous anti-tank barrier with mostly Cointet gates and, in some instances, rail fields, protected the PFL II.
The Belgians fully intended to fight on this part of the PFL and had assigned III Army corps to defend it. III Corps had two infantry divisions (Third Div, Second Div.) and could count on the support of the eleven artillery forts of Liège.
The renovated forts were not as strong as the modern ones and were designed only to withstand bombardment by 220 mm artillery shells.
* Ranges: 150mm: 17 km; 105 mm: 12 km; 75 mm howitzer: 5.2 km.
PFL III PFL III is the name given to three small bridgeheads on the Eastern bank of the Meuse, protecting the crossings against a German breakthrough through PFL II. The bunkers were positioned to hold the roads and possible avenues for motorised attacks under their fire. They did not form a continuous defensive position, as their mission was to delay any surprise attack on the Meuse crossings and buy time for the engineers to destroy the bridges. The anti-tank bunkers held the roads under their fire (the roads were to be obstructed by an anti-tank barrage or a crater created by engineers).
Total: 42 pillboxes, including 14 anti-tank bunkers. PFL IV PFL IV defends the West bank of the Meuse. It was organised in three echelons. Note that in many cases, the bunkers were incorporated into the bridge as illustrate below:
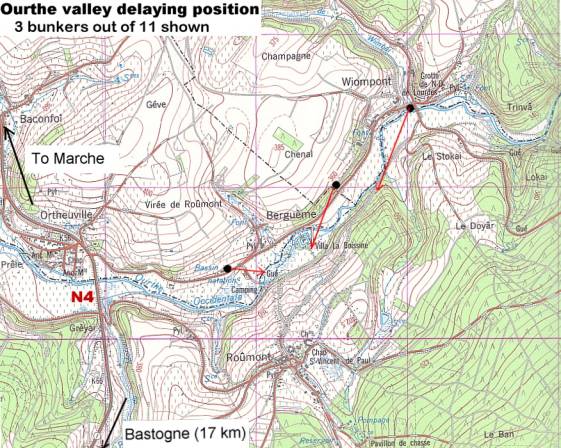
* Ranges: 150mm: 17 km; 105 mm: 12 km; 75 mm howitzer: 5.2 km The Ardennes The Belgians built a total of 321 pillboxes in the Ardennes. Of this total, 309 were light type machine gun bunkers (one heavy machine gun), and only twelve were medium type bunkers (the medium types were all concentrated in Libramont and Neufchâteau). The Ardennes works were grouped in centres de résistance (CR). Those CRs followed exactly the same principles we have outlined for the PFLs forward screen. On the whole, the Ardennes light works were used to defend a town, an important cross-roads or a valley. The mission identical: to allow retreating Belgian troops to delay the enemy and prevent him from outflanking any units. In 1940, the mission was carried out by seven battalions of the crack 1st Chasseurs Ardennais division which was to conduct an orderly retreat to the Meuse, until French would relieve them and cover the installation of the French army on the Meuse. The Chasseurs accomplished their mission with success, foiling attempts of the German army to rush past them. There were several engagements in which the bunker positions played a role, notably at Chabrehez, Martelange and Bodange.
Roughly speaking, there were two successive strings of CRs:
Other CRs worthy of note are the crossroads at Neufchâteau with 27 bunkers, Recogne with 20, and St-Hubert with seven.
|
|||||||||||||||||||||||||||||||||||||||||||||||||||||||||||||||||||||||||||||||||||||||||||||||||||||||||||||||||||||||||||||||||||||||||||||||||||

|
|